While I was in America, I was forced to realise all over again a horrible fact: American bread is a disgrace. It is sweet, spongy and completely devoid of character. It makes neither a satisfying sandwich nor tasty toast. It is, in a word, minging. So upon my return to the UK I vowed to learn how to make my own bread and prove that the Yanks, in this respect, are being lazy. How hard could it be?
I've started off with a white bread recipe because a) white bread is ridiculously delicious when done right and b) apparently it's easier. This is my first loaf-making outing and so we are learning together. Here's the concoction I used:
Ingredients:
500g strong white bread flour
1 packet (around 2.5tsp) of yeast
300ml water
2 tsp salt
3 tbsp oil
Method:
Get a generous bowl and mix the flour, yeast and salt. Just a wooden spoon is a fine weapon, no need to get fancy. Next pour in the oil and about half the water. Stir and stir. Add more water slowly until the dough is combined enough to get your hands in and start beating in around. You may not need all the water so add it in small doses. Unlike pastry, it doesn't matter if your dough is a bit too wet but it does matter if it's dry. Keep kneading and beating it until it sticks neither to your hands nor the bowl.
Next line the bowl with a drizzle of oil, plop the dough back in and let it rise for an hour. Don't be tempted to shorten this time, no good will come of it. After the hour's gone it should be looking a lot bigger. Flour a surface then beat the dough on it some more. Knead the hell out of it and let it rise for another hour whilst the oven is happily heating itself up to 220 degrees celcius. After the dough is risen, pop it in a loaf tin and shove in the oven for 25-30mins. My oven only took 25 so be sure to check it. You'll know it's ready when you turn it out and flick the bottom to hear a hollow noise. If there's no resounding tap then it's not done.
When you've eaten half of this loaf it will look like this:
Fantastic. Fluffy and light with a chewy crust. If this plus butter and Marmite doesn't do it for you then there's nothing more I can do.
With love,
A x
skip to main |
skip to sidebar
A baking blog, set up for the benefit of my great friend Oliver Clark. Here you will find easy recipes that you and I can muddle through together.
Monday, 12 September 2011
Sunday, 4 September 2011
Yum yum, damson plum
Hello again!
I have always wanted to be one of those incredible people (mostly women, of course) who are ready for Christmas by the time Halloween is over with. To that end, this weekend I have prepared my damson gin. For those of you who hate gin usually, do not be afraid, this is a fantastic sweet tipple that anyone with operational taste buds should enjoy.
First of all you need to locate some damsons. If you don't have your own tree, and none of your friends do either, they are available in fruit and veg shops at the moment. The season is not long so you should be looking for some now. Picking them is good fun. It took my friend Abi and I less than five minutes to pick enough damsons to make three bottles of gin.
Ingredients:
450g damsons
85g sugar
1 small bottle of gin, I think they are around 380ml, you know the ones I mean.
Method:
So simple. Prick a hole or two in each damson with a skewer or similar pointy tool. Pop them into a kilner jar or other airtight container. Pour in the gin and the sugar and shake up well. Then you need to leave it for around three months. Be sure to cover all the damsons with the gin or the top ones will go funny. Shake regularly. Taste the gin after around two months. If it is too tart, add more sugar. And that's it!
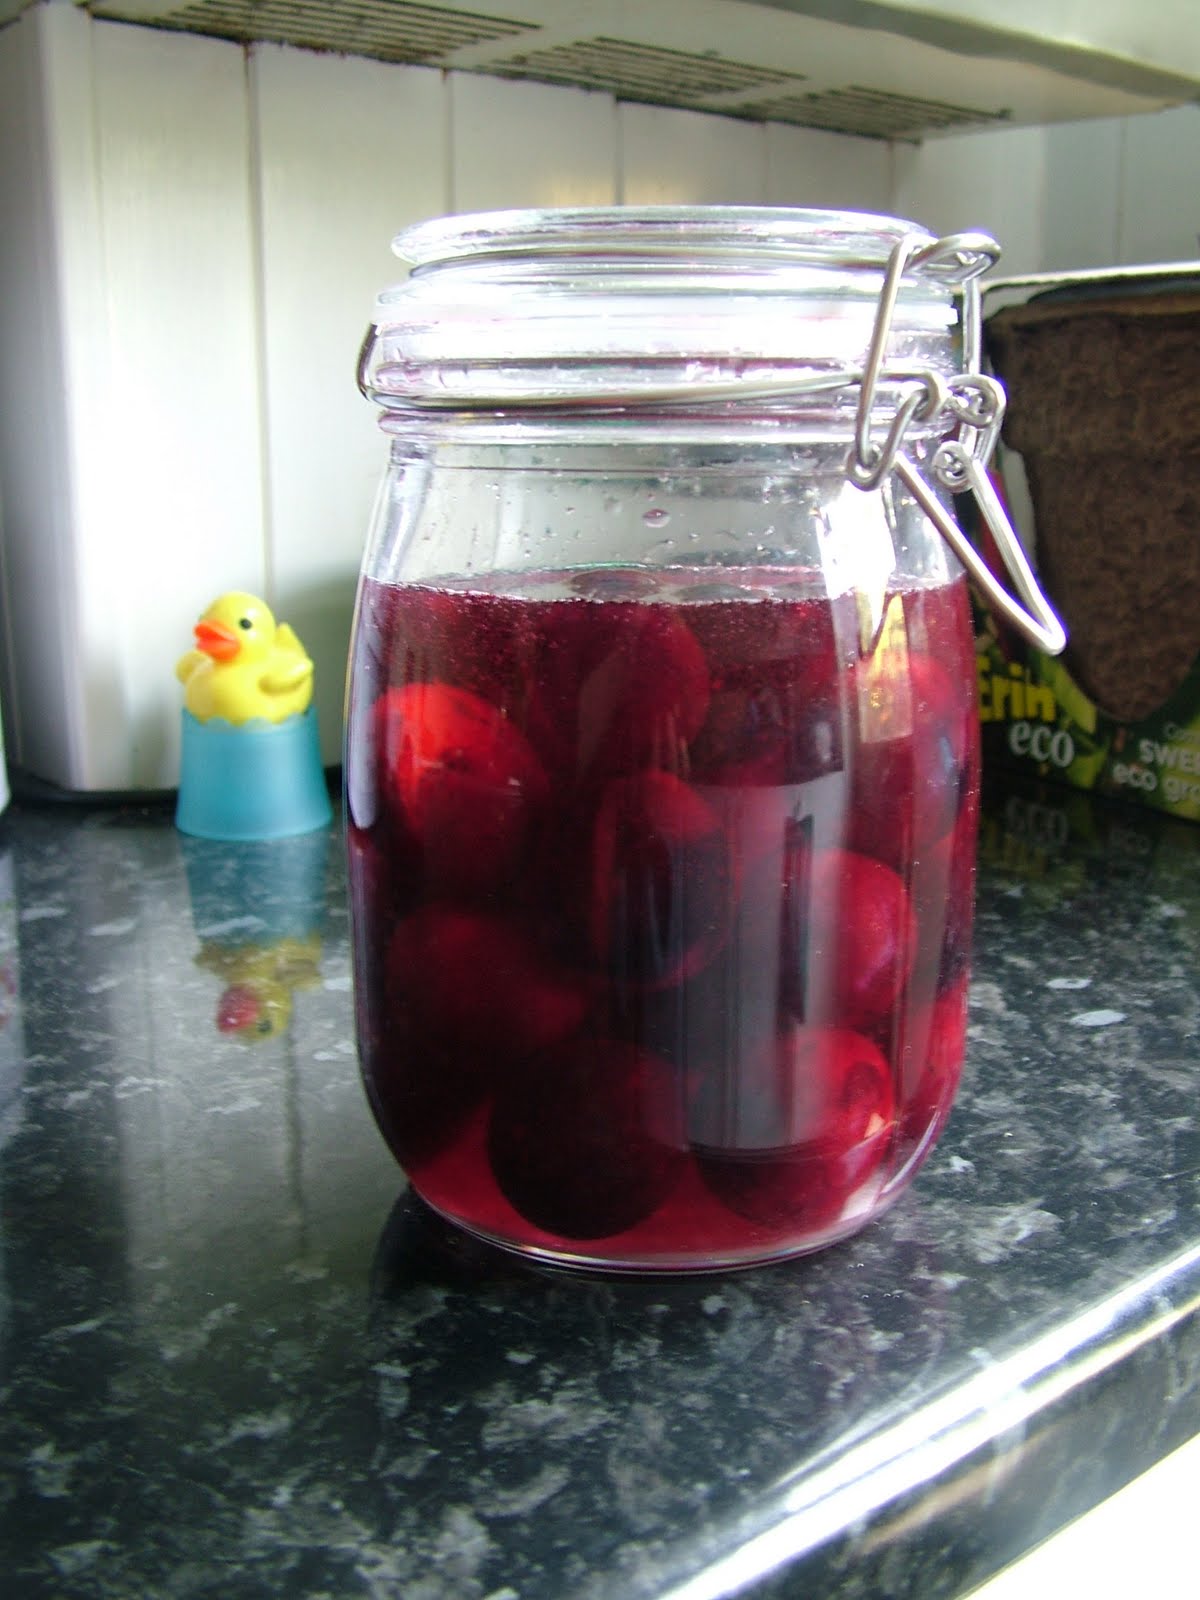
Here's how mine looks right now:
Lovely colour ay?
Happy brewing!
A x
I have always wanted to be one of those incredible people (mostly women, of course) who are ready for Christmas by the time Halloween is over with. To that end, this weekend I have prepared my damson gin. For those of you who hate gin usually, do not be afraid, this is a fantastic sweet tipple that anyone with operational taste buds should enjoy.
First of all you need to locate some damsons. If you don't have your own tree, and none of your friends do either, they are available in fruit and veg shops at the moment. The season is not long so you should be looking for some now. Picking them is good fun. It took my friend Abi and I less than five minutes to pick enough damsons to make three bottles of gin.
Ingredients:
450g damsons
85g sugar
1 small bottle of gin, I think they are around 380ml, you know the ones I mean.
Method:
So simple. Prick a hole or two in each damson with a skewer or similar pointy tool. Pop them into a kilner jar or other airtight container. Pour in the gin and the sugar and shake up well. Then you need to leave it for around three months. Be sure to cover all the damsons with the gin or the top ones will go funny. Shake regularly. Taste the gin after around two months. If it is too tart, add more sugar. And that's it!
Here's how mine looks right now:
Lovely colour ay?
Happy brewing!
A x
Saturday, 3 September 2011
Return of the Ash
Well hello!
Oh it's been such a long time since we were last together, surrounded by flour and sugar and chocolate chips! May was filled with moving, and June, July and August with holidays. Oh what a troubled life I lead. BUT I am back now, and I have gathered a lot of baking and cooking ideas in America (land of the free, home of the fat) and I cannot wait to share them.
One thing the Americans really do know how to bake is cookies. They are all over it. They have an entire aisle in their shops devoted to cookies of every flavour, shape and size. Their kitchen shops are packed with cookie cutters and so I stocked up on some unusual shapes. Yesterday, as a present for Sal who is a plane geek, I made some spitfire biscuits. It was my first time making biscuit dough that is stiff enough to roll out- my gooey cookies certainly would not survive in a mould. So let's see how they turned out:
Wow! Those babies are enough to scare Hitler.
The recipe is wonderfully easy and yields a lot of dough so do give this a try.
Ingredients:
175g butter
200g caster sugar
400g plain flour
1 tsp vanilla essence
1 tsp baking powder
1 tsp salt
2 eggs
Method:
Preheat the oven up to 185 degrees celcius. With shaped biscuits, you don't want the oven too hot or they will swell and lose their shape. Next cream up the butter and sugar. It sometimes help to dice the butter if it's a little hard and then rub it in to the sugar with your fingers at first. Then get a spoon out and bash it around until it is fluffy.
Next you want to beat in the eggs and vanilla. You can do this by hand or with a mixer if you have one. Don't worry that you've made scambled eggs by accident, it's all good. Combine the dry ingredients then throw them in the bowl with the gooey eggs sugar stuff and mix gently. When it's ready, it should not be sticking much to your hands or the spoon. If it is, add more flour until it's smooth.
Grab some cling film and flour it, then divide the dough into two and wrap the balls in the cling film. Stick one in the freezer- that's your dough for the next time you want biscuits. Trust me, having ready-made dough is a wonderful thing. Put the other one in the fridge and go do something else for an hour. When time's up, flour a surface and roll out the dough from the fridge to no thinner than about 1.5cm. The thicker it is, the bigger the biscuit but they may lose their shape if too large. Select your favourite cookie cutter and get busy! Make sure you gather up all the offcuts and roll them out again to make the most of your dough. Feel free to eat any that is leftover (particularly good stirred into ice cream...)
Bake for about ten minutes, or until they are starting to go golden brown around the edges. Cool on a wire rack then make plane noises as you fly one into your mouth.
Ideal!
A x
Oh it's been such a long time since we were last together, surrounded by flour and sugar and chocolate chips! May was filled with moving, and June, July and August with holidays. Oh what a troubled life I lead. BUT I am back now, and I have gathered a lot of baking and cooking ideas in America (land of the free, home of the fat) and I cannot wait to share them.
One thing the Americans really do know how to bake is cookies. They are all over it. They have an entire aisle in their shops devoted to cookies of every flavour, shape and size. Their kitchen shops are packed with cookie cutters and so I stocked up on some unusual shapes. Yesterday, as a present for Sal who is a plane geek, I made some spitfire biscuits. It was my first time making biscuit dough that is stiff enough to roll out- my gooey cookies certainly would not survive in a mould. So let's see how they turned out:
Wow! Those babies are enough to scare Hitler.
The recipe is wonderfully easy and yields a lot of dough so do give this a try.
Ingredients:
175g butter
200g caster sugar
400g plain flour
1 tsp vanilla essence
1 tsp baking powder
1 tsp salt
2 eggs
Method:
Preheat the oven up to 185 degrees celcius. With shaped biscuits, you don't want the oven too hot or they will swell and lose their shape. Next cream up the butter and sugar. It sometimes help to dice the butter if it's a little hard and then rub it in to the sugar with your fingers at first. Then get a spoon out and bash it around until it is fluffy.
Next you want to beat in the eggs and vanilla. You can do this by hand or with a mixer if you have one. Don't worry that you've made scambled eggs by accident, it's all good. Combine the dry ingredients then throw them in the bowl with the gooey eggs sugar stuff and mix gently. When it's ready, it should not be sticking much to your hands or the spoon. If it is, add more flour until it's smooth.
Grab some cling film and flour it, then divide the dough into two and wrap the balls in the cling film. Stick one in the freezer- that's your dough for the next time you want biscuits. Trust me, having ready-made dough is a wonderful thing. Put the other one in the fridge and go do something else for an hour. When time's up, flour a surface and roll out the dough from the fridge to no thinner than about 1.5cm. The thicker it is, the bigger the biscuit but they may lose their shape if too large. Select your favourite cookie cutter and get busy! Make sure you gather up all the offcuts and roll them out again to make the most of your dough. Feel free to eat any that is leftover (particularly good stirred into ice cream...)
Bake for about ten minutes, or until they are starting to go golden brown around the edges. Cool on a wire rack then make plane noises as you fly one into your mouth.
Ideal!
A x
Thursday, 14 April 2011
Waste Naught, Want Naught
Well, firstly, sorry it's been a couple of weeks since we last met to discuss the wonderful world of baking. I haven't been able to do much of it recently. The downside of baking is you run the risk of turning into Michelle McManus in an alarmingly short period of time. Baking feels so comforting and tastes so wonderful precisely because it's so bad for you! But only in large quantities right? Everything in moderation. So let's get on with it.
Due to my thoughts on food waste, I am very interested in the role baking can take in helping to cut down on food waste. A past-its-best piece of fruit or veg is incredibly difficult to sell as a tasty treat, but just try keeping cake or cookies or tart around the house for more than a couple of days. Baking is the original and best (not to mention the most delicious) way to use up things in the fridge.
So what have I been using up? Well, Ed and I get a fruit box delivered each week. Sometimes we get a large quantity of oranges and we never get through them fast as we're both too lazy to peel anything! So I had a few big oranges going soft and taking on a life of their own in the fruit bowl. They're perfect to make an orange cake. I adapted this recipe from one for a lemon cake, so if it's lemons you've got lying around then feel free to substitute. This cake is extremely light and moist, juicy and creamy. It's a perfect sunny afternoon cake, or perhaps at a party with a glass of champagne.
Ingredients (cake):
225g butter, diced
225g granulated sugar
225g self-raising flour
2 tsp baking powder
4 eggs
50ml double cream
Grated zest and juice of 1-2 oranges (your choice)
Ingredients (filling):
Grated zest and juice of an orange
2 eggs
60g butter
90g sugar
200g mascarpone
Ingredients (topping):
Juice of one orange
50g sugar
Method:
First off we need to make an orange curd for the filling. Put all the filling ingredients in a heatproof bowl and set it over a saucepan of simmering water on the hob (just fill a saucepan half full, let the water gently make bubbles but not boil and place the bowl with ingredients in the pan). Whisk it up until the butter is melted then just keep ooooooooooon whisking for a few minutes until it looks a bit like thick custard. Gloop it through a seive into a bowl, cover in clingfilm and shove it in the fridge for a couple of hours.
Now we do the usual, preheat the oven to 170deg, 190 if you don't have a fan oven and gas mark 5 if you're retro. Butter up a cake tin, somewhere around 20cm if you have it. Removable based tins are really useful, but I used silicon and it worked just fine. Butter it generously if you have neither. Pop all the ingredients into a big bowl and cream together. Way easier with a processor but I don't have one so you'll be fine. Once it's all smooth and yummy looking, spoon it into the tin and bake it for between 45-55 mins. Keep testing it, make sure it's cooked (skewer will come out clean) but not tough or burned at all. When it's out, and still hot, combine the topping ingredients and spoon it over the cake. Leave it now, if you can! The juice will sink in to the sponge.
Blend up 100g of the orange curd with the mascarpone. You probs won't need it all, more like half, but apparently it's awesome on toast :) Cut the cake in two with a bread knife, gently cutting round. Spread the filling generously and reassemble the cake. If you're not going to eat it right away, cover and chill it but bring back to room temp before serving.
And that's it! It really is amazingly tasty and light. Give it a go.
A x
Due to my thoughts on food waste, I am very interested in the role baking can take in helping to cut down on food waste. A past-its-best piece of fruit or veg is incredibly difficult to sell as a tasty treat, but just try keeping cake or cookies or tart around the house for more than a couple of days. Baking is the original and best (not to mention the most delicious) way to use up things in the fridge.
So what have I been using up? Well, Ed and I get a fruit box delivered each week. Sometimes we get a large quantity of oranges and we never get through them fast as we're both too lazy to peel anything! So I had a few big oranges going soft and taking on a life of their own in the fruit bowl. They're perfect to make an orange cake. I adapted this recipe from one for a lemon cake, so if it's lemons you've got lying around then feel free to substitute. This cake is extremely light and moist, juicy and creamy. It's a perfect sunny afternoon cake, or perhaps at a party with a glass of champagne.
Ingredients (cake):
225g butter, diced
225g granulated sugar
225g self-raising flour
2 tsp baking powder
4 eggs
50ml double cream
Grated zest and juice of 1-2 oranges (your choice)
Ingredients (filling):
Grated zest and juice of an orange
2 eggs
60g butter
90g sugar
200g mascarpone
Ingredients (topping):
Juice of one orange
50g sugar
Method:
First off we need to make an orange curd for the filling. Put all the filling ingredients in a heatproof bowl and set it over a saucepan of simmering water on the hob (just fill a saucepan half full, let the water gently make bubbles but not boil and place the bowl with ingredients in the pan). Whisk it up until the butter is melted then just keep ooooooooooon whisking for a few minutes until it looks a bit like thick custard. Gloop it through a seive into a bowl, cover in clingfilm and shove it in the fridge for a couple of hours.
Now we do the usual, preheat the oven to 170deg, 190 if you don't have a fan oven and gas mark 5 if you're retro. Butter up a cake tin, somewhere around 20cm if you have it. Removable based tins are really useful, but I used silicon and it worked just fine. Butter it generously if you have neither. Pop all the ingredients into a big bowl and cream together. Way easier with a processor but I don't have one so you'll be fine. Once it's all smooth and yummy looking, spoon it into the tin and bake it for between 45-55 mins. Keep testing it, make sure it's cooked (skewer will come out clean) but not tough or burned at all. When it's out, and still hot, combine the topping ingredients and spoon it over the cake. Leave it now, if you can! The juice will sink in to the sponge.
Blend up 100g of the orange curd with the mascarpone. You probs won't need it all, more like half, but apparently it's awesome on toast :) Cut the cake in two with a bread knife, gently cutting round. Spread the filling generously and reassemble the cake. If you're not going to eat it right away, cover and chill it but bring back to room temp before serving.
And that's it! It really is amazingly tasty and light. Give it a go.
A x
Tuesday, 5 April 2011
Appley Ever After
Last week our fruit basket was looking a bit sorry for itself, overflowing with oranges (with neither me nor Ed nor Sal can ever be bothered to peel and actually eat) and several apples that had had that slightly spongy feel to them since the day they arrived. Baking is one of if not the best solution for using up over-ripe fruit because it really doesn't matter what state you've let the poor apple or pear get to, it'll still be fantastic once it's stowed safely in cake batter.
So the sad looking apples made their way into a Dorset apple cake. I resent this name being used to widely as, being from Dorset, I can see nothing particularly Dorset-like in the making of it, especially as all the recipes for it seem to be different. This one is fairly dense but not heavy and will suit those who are not into sickly cakes. It has a delicious spicy kick to it, courtesy of cinammon, and even non-fruit lovers should enjoy it. There are no special ingredients and it takes only a few minutes to create so get to it.
Ingredients:
225g of apples of your choice (or those that look the worst from your bowl!)
225g self-raising flour
1tsp baking powder
1tsp of cinammon or 1/2 tsp of mixed spice (depending on preference)
125g diced butter
125g caster sugar
2 eggs, beaten
Pre-heat that oven you know so well to 190 deg celcius and butter up a round tin. Doesn't matter too much what kind, just make sure you'll be able to leaver the cake out OK.
Core and dice the apples. Most recipes tell you to peel them but I see no need to remove this tasty and nutrional part of the fruit so I wouldn't bother. Sift the flour, baking powder and mixed spice into a bowl together and chuck the butter in. Rub the butter in with your fingers until you have a nice crumbly mixture. Bung the sugar and apple in there too, then slowly stir the eggs in.
Spoon the mixture into your tin. Next you wanna thinly slice a bit of extra apple and arrange the slices in a pretty pattern on top. Pop it into the oven for between 30-40 minutes. It'll be springy to poke when it's ready and if you stick a knife it it'll come out clean.
And that's it! So simples. When it's out the oven, sprinkly a tbsp of caster sugar onto the hot cake and leave it to cool. Then have a big slice with a cup of tea. Or, as I did, a massive glass of wine.
Winning.
A x
So the sad looking apples made their way into a Dorset apple cake. I resent this name being used to widely as, being from Dorset, I can see nothing particularly Dorset-like in the making of it, especially as all the recipes for it seem to be different. This one is fairly dense but not heavy and will suit those who are not into sickly cakes. It has a delicious spicy kick to it, courtesy of cinammon, and even non-fruit lovers should enjoy it. There are no special ingredients and it takes only a few minutes to create so get to it.
Ingredients:
225g of apples of your choice (or those that look the worst from your bowl!)
225g self-raising flour
1tsp baking powder
1tsp of cinammon or 1/2 tsp of mixed spice (depending on preference)
125g diced butter
125g caster sugar
2 eggs, beaten
Pre-heat that oven you know so well to 190 deg celcius and butter up a round tin. Doesn't matter too much what kind, just make sure you'll be able to leaver the cake out OK.
Core and dice the apples. Most recipes tell you to peel them but I see no need to remove this tasty and nutrional part of the fruit so I wouldn't bother. Sift the flour, baking powder and mixed spice into a bowl together and chuck the butter in. Rub the butter in with your fingers until you have a nice crumbly mixture. Bung the sugar and apple in there too, then slowly stir the eggs in.
Spoon the mixture into your tin. Next you wanna thinly slice a bit of extra apple and arrange the slices in a pretty pattern on top. Pop it into the oven for between 30-40 minutes. It'll be springy to poke when it's ready and if you stick a knife it it'll come out clean.
And that's it! So simples. When it's out the oven, sprinkly a tbsp of caster sugar onto the hot cake and leave it to cool. Then have a big slice with a cup of tea. Or, as I did, a massive glass of wine.
Winning.
A x
Wednesday, 30 March 2011
Ways To Feel Happy
Last week I baked cookies. I've become a bit of a regular on the cookie baking scene because I think they are a very special part of baking. For a start, they are one of those foods that you would be hard pushed to find someone in opposition to. Let's face it, everyone loves a cookie. They symbolise all that's good and comforting about life, it's hard to feel unhappy whilst eating one. They're great at any time of day and for any reason.
Top of everyone's list for cookie types seems to be two things: chocolate and chewy. Cookies are best when they're packed with oozing chocolate, still warm through slightly, and served with ice cold milk. So I went in search of a gooey recipe and found one courtesy of the BBC. It wasn't chocolately enough though, so this final draft has been tweaked slightly to better satisfy the chocoholic in all of us. Have a go at making them and, in turn, making someone's day.
There they are, perfect in their imperfection.
Ingredients:
225g margerine or butter (I always prefer butter, but it is harder to work with)
170g soft brown sugar (works fine with caster but is best with brown)
340g plain flour
200g chocolate (I like to do one dark and one milk but it's up to you)
4 tbsp golden syrup
4 tbsp milk
Method:
Preheat that oven of yours to 150 deg celcius or 170 for non-fans (that's non-fan ovens, not people who aren't fans of ovens).
Cream together the butter and sugar until light and fluffy. You can do this by hand or machine, whatever your preference. Add the golden syrup, milk and smashed up chocolate, then mix. This will look like really gross scrambled eggs but have no fear, it's as is should be. Add the flour slowly, mixing gently as you go until you have a smooth cookie batter. If it's looking a bit runny, add a drop more flour, if it's too dry then add a little milk. It should be medium consistency.
Cover a baking tray with greaseproof paper, or if you have none then butter it generously, and spoon the batter on in blobs. The cookies will grow to be about twice the size of your blobs so be careful. If you make them too large, the bottom will burn before the middle cooks and this is not a pleasurable eating experience. Pop in the oven for about 10 minutes, until the cookies are turning golden brown. Do not over cook or you'll lose that gooey experience.
Eat these slightly warm, or pop in microwave if they are completely cooled. This is such a base pleasure, it's wonderful. Set 5 minutes aside to have a glass of milk or dunk them in a cup of tea and try to forget your troubles.
It turns out cookies are as good as prozac ;)
Savour it.
A x
PS - If you enjoy this blog, please do subscribe by using the sign-up on the right. It's easy and will notify you when I post.
Top of everyone's list for cookie types seems to be two things: chocolate and chewy. Cookies are best when they're packed with oozing chocolate, still warm through slightly, and served with ice cold milk. So I went in search of a gooey recipe and found one courtesy of the BBC. It wasn't chocolately enough though, so this final draft has been tweaked slightly to better satisfy the chocoholic in all of us. Have a go at making them and, in turn, making someone's day.
There they are, perfect in their imperfection.
Ingredients:
225g margerine or butter (I always prefer butter, but it is harder to work with)
170g soft brown sugar (works fine with caster but is best with brown)
340g plain flour
200g chocolate (I like to do one dark and one milk but it's up to you)
4 tbsp golden syrup
4 tbsp milk
Method:
Preheat that oven of yours to 150 deg celcius or 170 for non-fans (that's non-fan ovens, not people who aren't fans of ovens).
Cream together the butter and sugar until light and fluffy. You can do this by hand or machine, whatever your preference. Add the golden syrup, milk and smashed up chocolate, then mix. This will look like really gross scrambled eggs but have no fear, it's as is should be. Add the flour slowly, mixing gently as you go until you have a smooth cookie batter. If it's looking a bit runny, add a drop more flour, if it's too dry then add a little milk. It should be medium consistency.
Cover a baking tray with greaseproof paper, or if you have none then butter it generously, and spoon the batter on in blobs. The cookies will grow to be about twice the size of your blobs so be careful. If you make them too large, the bottom will burn before the middle cooks and this is not a pleasurable eating experience. Pop in the oven for about 10 minutes, until the cookies are turning golden brown. Do not over cook or you'll lose that gooey experience.
Eat these slightly warm, or pop in microwave if they are completely cooled. This is such a base pleasure, it's wonderful. Set 5 minutes aside to have a glass of milk or dunk them in a cup of tea and try to forget your troubles.
It turns out cookies are as good as prozac ;)
Savour it.
A x
PS - If you enjoy this blog, please do subscribe by using the sign-up on the right. It's easy and will notify you when I post.
Friday, 25 March 2011
Worship Me, For I Am Mighty
Right. So I made the best chocolate cake in the world. Ever. Probably. Sal said it was the best she'd ever had and she is a doctor so we must respect her rulings. I'll include some pics of it as I was cooking it, so you can see what it should look like. It's from a Good Food recipe. In order for this cake to work, follow the recipe and the ingredient measures exactly. Fo' serious.
I mean, come on, look at that! That's a thing of beauty, if I do say so myself.
Ingredients (cake):
200g quality dark choc (70% cocoa solids)
200g butter (not marge) diced
1 tbsp instant coffee granules
85g self-raising flour
85g plain flour
1/4 tsp of bicarbonate of soda
200g dark muscavado sugar (light will do, but dark makes a richer cake)
200g caster sugar
25g cocoa powder
3 eggs
75ml butter milk
Ingredients (topping):
Bar of white chocolate
200g quality dark choc
284ml double cream
2 tblsp caster sugar
Firstly: If you don't have any butter milk then a cup full of milk with the juice of a whole lemon mixed in, then left for 5 minutes, will do the same job.
As usual, pre-heat the oven to 140 deg or 160 if no fan. Line a cake tin, around 20cm if you have it, or if possible use one with a removable base. If you don't have lining then butter it extremely thoroughly.
Smash up the chocolate and melt it in a pan with the butter. Dissolve the coffee granules in 125ml cold water and pour that in with the melting choc and butter. Melt, warm and mix. Yeehah. Do not over heat this, you don't want anything sticking to the pan at all. While that's doing its thing, mix the flours, sugars, bicarb and cocoa in a bowl (sift if you can). Get your hands in the bowl to do this as you'll need to rub the lumps that muscavado makes out. No lumps at all if you can manage it. Next beat the eggs and put them in the flour mix bowl with the buttermilk. Stir stir stir.
Pour the chocolate buttery yummyness into the floury sugaryness and mix until you have a smoothe cake batter. Oh Lord. I can almost taste it typing this. Pour evenly into your cake tin and stick it in the oven. Mine took exactly 1 hour 23 minutes to be ready. After about 1 hr 10 a skewer came out clean but the top felt a bit jelly like so make sure that it is fairly firm to the touch on top. Do NOT leave in any longer than strictly necessary, it shouldn't need more than 1 hour 30 minutes, or you won't get the fudgy effect.
Whilst the cake is doing its thang, make the ganache topping (if you've read my other posts you'll be able to do this with your eyes closed by now!). Smash the dark chocolate up and put it in a bowl. Warm the cream over a low heat, stirring in the caster sugar too. Heat until almost boiled then pour into the bowl and stir until completely melted. It will look weird and milky at first but will soon thicken up. Put in the fridge to thicken but be sure to keep a soft spreadable texture (if you over cool it, just microwave for a few seconds).
Get the cake out, turn it onto a cooling rack and be sure to wait until it's completely cool, however hard this task is! It should look a bit like this:
If it doesn't, don't worry! I'm sure it'll be delcious. When it's cool, get a bread knife and cut the cake into three, horizontally, so you have three thin layers. Don't try and carve straight through the middle, stick the knife in the gently cut round, turning the cake as you go. When it's in three, get your ganache out and spread a fairly thin layer onto the bottom and middle layers of the cake so that you have two layers of filling. If you catch my drift...
Once you've assembled it back into one cake with your dual-filling, smother the entire thing, including the outside edges, in ganache. Get it all over so no cake is visible. This is super fun! You can do patterns if you want or use a pallette knife to make little waves. Next get your white choc and melt it for a very few seconds in the oven or microwave so that it is just starting to become soft at the edges. Get a peeler and, applying pressure downwards, peel along it like you would a carrot. If you have a cheese slicer, use that instead. This is actually pretty tricky so try to stick with it. It will make the white choc curls you can see on the first pic. I arranged these in a flour type thing but you can do what you like with it really! Finish by grating the rest of the white chocolate over the whole cake.
If this isn't the best chocolate cake you've ever tasted, I want to know why. It's relatively simple but makes a truly impressive cake, perfect for a present or party. Let me know if you try this one.
Enjoy, children.
A x
I mean, come on, look at that! That's a thing of beauty, if I do say so myself.
Ingredients (cake):
200g quality dark choc (70% cocoa solids)
200g butter (not marge) diced
1 tbsp instant coffee granules
85g self-raising flour
85g plain flour
1/4 tsp of bicarbonate of soda
200g dark muscavado sugar (light will do, but dark makes a richer cake)
200g caster sugar
25g cocoa powder
3 eggs
75ml butter milk
Ingredients (topping):
Bar of white chocolate
200g quality dark choc
284ml double cream
2 tblsp caster sugar
Firstly: If you don't have any butter milk then a cup full of milk with the juice of a whole lemon mixed in, then left for 5 minutes, will do the same job.
As usual, pre-heat the oven to 140 deg or 160 if no fan. Line a cake tin, around 20cm if you have it, or if possible use one with a removable base. If you don't have lining then butter it extremely thoroughly.
Smash up the chocolate and melt it in a pan with the butter. Dissolve the coffee granules in 125ml cold water and pour that in with the melting choc and butter. Melt, warm and mix. Yeehah. Do not over heat this, you don't want anything sticking to the pan at all. While that's doing its thing, mix the flours, sugars, bicarb and cocoa in a bowl (sift if you can). Get your hands in the bowl to do this as you'll need to rub the lumps that muscavado makes out. No lumps at all if you can manage it. Next beat the eggs and put them in the flour mix bowl with the buttermilk. Stir stir stir.
Pour the chocolate buttery yummyness into the floury sugaryness and mix until you have a smoothe cake batter. Oh Lord. I can almost taste it typing this. Pour evenly into your cake tin and stick it in the oven. Mine took exactly 1 hour 23 minutes to be ready. After about 1 hr 10 a skewer came out clean but the top felt a bit jelly like so make sure that it is fairly firm to the touch on top. Do NOT leave in any longer than strictly necessary, it shouldn't need more than 1 hour 30 minutes, or you won't get the fudgy effect.
Whilst the cake is doing its thang, make the ganache topping (if you've read my other posts you'll be able to do this with your eyes closed by now!). Smash the dark chocolate up and put it in a bowl. Warm the cream over a low heat, stirring in the caster sugar too. Heat until almost boiled then pour into the bowl and stir until completely melted. It will look weird and milky at first but will soon thicken up. Put in the fridge to thicken but be sure to keep a soft spreadable texture (if you over cool it, just microwave for a few seconds).
Get the cake out, turn it onto a cooling rack and be sure to wait until it's completely cool, however hard this task is! It should look a bit like this:
If it doesn't, don't worry! I'm sure it'll be delcious. When it's cool, get a bread knife and cut the cake into three, horizontally, so you have three thin layers. Don't try and carve straight through the middle, stick the knife in the gently cut round, turning the cake as you go. When it's in three, get your ganache out and spread a fairly thin layer onto the bottom and middle layers of the cake so that you have two layers of filling. If you catch my drift...
Once you've assembled it back into one cake with your dual-filling, smother the entire thing, including the outside edges, in ganache. Get it all over so no cake is visible. This is super fun! You can do patterns if you want or use a pallette knife to make little waves. Next get your white choc and melt it for a very few seconds in the oven or microwave so that it is just starting to become soft at the edges. Get a peeler and, applying pressure downwards, peel along it like you would a carrot. If you have a cheese slicer, use that instead. This is actually pretty tricky so try to stick with it. It will make the white choc curls you can see on the first pic. I arranged these in a flour type thing but you can do what you like with it really! Finish by grating the rest of the white chocolate over the whole cake.
If this isn't the best chocolate cake you've ever tasted, I want to know why. It's relatively simple but makes a truly impressive cake, perfect for a present or party. Let me know if you try this one.
Enjoy, children.
A x
Blog Archive
About Me
- Aisling
- My name is Aisling Creedon. I am currently trying not to enter any more supermarkets. I am also learning to bake and want you to learn with me.
Followers
Powered by Blogger.